ShopDreamUp AI ArtDreamUp
Deviation Actions


3danusasianasiangirlassasscheekasshairassholebangladeshbodyhairburmesebuttholechinesehairyhairyassindianindonesianjapanesemalaysianakednudephotoshoppiercingspornstarsoutheastasiaswordvoluptuouswarriorwomangirlasianjapanesecougarwomancurvybodysexybeautifulbollywoodactressambientavalancherpussypiercingbuttbootyhairypussycurvyhipsdazstudioposergenesis2femalebuttwhoredazstudiopro46hongkong
Description
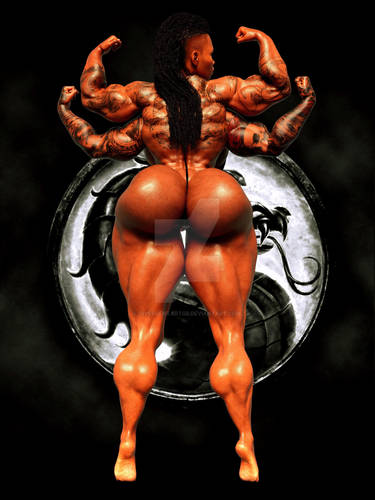
LOL, here's my original character Kari's theme song for this pic. This song kept playing in my head while I was doing the strenuous postwork in Photoshop... I don't know what Trinidadian carnivals have to do with Shanghai warrior sluts, LOL!
The oriental architecture background is from wallpaperup.com. Rendered Kari in DAZ 4.7 with Keshi's promo lights as a PNG and pimped it up big time in Photoshop CS6.... The jewelry is Hanyma BeJeweled, and the moonblade is from Black Moon.
++++++++++++++++++++++++++++++++++++++++
OK, here's what I did in Photoshop CS6:
1. Loaded the background and then Kari; duplicated Kari, made the bottom Kari layer larger, set it to 95% opacity, and masked away her moonblades... Merged the Kari layers
2. Made some fake rim lighting. Masked away (50% opacity and 100% opacity for the bottom parts) parts I didn't want too much rim effect. I screwed up and made the rim more greenish, LOL!
3. Duplicated the oriental architecture background and put it over all the layers as a clipping mask; Gaussian Blur it around 50-60. Set to Soft Light at 30% opacity.
4. Created a stamp (Ctrl/Cmd+Alt+Shift+E) and duplicated it four times. I created TWO Amazing Freaky Details groups--the first one was Gaussian Blur (instead of Surface Blur) at 60 and the second was Surface Blur at 20 for both values. (Opacities were kept at 100%).
5. Duplicated the whole Gaussian Blur Amazing Freaky Details group, merged the group, desaturated it, and Gaussian Blurred it by 25, if I remember....") Opacity is 30%!
Opacity is 30%!
6. Created another doggone stamp (Ctrl/Cmd+Alt+Shift+E) and summoned a curves adjustment layer. Increased the RGB curve slightly to the upper left to brighten the image. With a black brush on the curves adjustment layer mask (100% brush opacity and 0% hardness), I masked out parts of the image that I wanted darker (the vignette effect!). I duplicated this curves adjustment layer, set it to Multiply, and inverted it (Ctrl/Cmd+I) to create further (a stronger vignette); set this layer to 90% opacity.
7 (optional). I thought I could highlight the jewelry with a reddish-peach Linear Light brush, but it didn't really help...................... The previous effects pretty much washed out its color...
8. Added a sun haze effect where the sun meets the moonblade by created a final blank layer above all other layers. I picked the color of the sun-painted sky close to the sunset. With a big brush, I dabbed a splotch on the blade (just one click) and set this layer to Screen at 70% opacity.
++++++++++++++++++++++++++++++++++++++++
Here's her morphs again!!
 Head Morphs
Sayuri Head, Dilanna Head, EJEstrellaHead, Gogo Head, Janna Head, Keshi Head, Maeko Head, and Mayuree Head = 0.2
Body Morphs
- Meridiana Body, DD_LilyBody, Thigh Thickness = 1.0
- Thigh Thickness 2, Shin Thickness, Breasts Cleavage = 0.5
- Lilith 6 Body = 0.7
- Fitness, Fitness Details, Fitness Size, Breasts Cleavage, Breasts Implants = 0.5
- Voluptuous, Breasts Natural, Breasts Shape 4 = 0.2
- Giselle 6 Body = 0.4
- Arm Thickness = 30%
The oriental architecture background is from wallpaperup.com. Rendered Kari in DAZ 4.7 with Keshi's promo lights as a PNG and pimped it up big time in Photoshop CS6.... The jewelry is Hanyma BeJeweled, and the moonblade is from Black Moon.
++++++++++++++++++++++++++++++++++++++++
OK, here's what I did in Photoshop CS6:
1. Loaded the background and then Kari; duplicated Kari, made the bottom Kari layer larger, set it to 95% opacity, and masked away her moonblades... Merged the Kari layers
2. Made some fake rim lighting. Masked away (50% opacity and 100% opacity for the bottom parts) parts I didn't want too much rim effect. I screwed up and made the rim more greenish, LOL!
3. Duplicated the oriental architecture background and put it over all the layers as a clipping mask; Gaussian Blur it around 50-60. Set to Soft Light at 30% opacity.
4. Created a stamp (Ctrl/Cmd+Alt+Shift+E) and duplicated it four times. I created TWO Amazing Freaky Details groups--the first one was Gaussian Blur (instead of Surface Blur) at 60 and the second was Surface Blur at 20 for both values. (Opacities were kept at 100%).
5. Duplicated the whole Gaussian Blur Amazing Freaky Details group, merged the group, desaturated it, and Gaussian Blurred it by 25, if I remember....
6. Created another doggone stamp (Ctrl/Cmd+Alt+Shift+E) and summoned a curves adjustment layer. Increased the RGB curve slightly to the upper left to brighten the image. With a black brush on the curves adjustment layer mask (100% brush opacity and 0% hardness), I masked out parts of the image that I wanted darker (the vignette effect!). I duplicated this curves adjustment layer, set it to Multiply, and inverted it (Ctrl/Cmd+I) to create further (a stronger vignette); set this layer to 90% opacity.
7 (optional). I thought I could highlight the jewelry with a reddish-peach Linear Light brush, but it didn't really help...................... The previous effects pretty much washed out its color...
8. Added a sun haze effect where the sun meets the moonblade by created a final blank layer above all other layers. I picked the color of the sun-painted sky close to the sunset. With a big brush, I dabbed a splotch on the blade (just one click) and set this layer to Screen at 70% opacity.
++++++++++++++++++++++++++++++++++++++++
Here's her morphs again!!
Sayuri Head, Dilanna Head, EJEstrellaHead, Gogo Head, Janna Head, Keshi Head, Maeko Head, and Mayuree Head = 0.2
- Meridiana Body, DD_LilyBody, Thigh Thickness = 1.0
- Thigh Thickness 2, Shin Thickness, Breasts Cleavage = 0.5
- Lilith 6 Body = 0.7
- Fitness, Fitness Details, Fitness Size, Breasts Cleavage, Breasts Implants = 0.5
- Voluptuous, Breasts Natural, Breasts Shape 4 = 0.2
- Giselle 6 Body = 0.4
- Arm Thickness = 30%
Image size
1920x1200px 2.3 MB
Mature
© 2015 - 2024 ambient-avalancher
Comments21
Join the community to add your comment. Already a deviant? Log In
Amazing work!