ShopDreamUp AI ArtDreamUp
Deviation Actions
Luxury Perfect Girls- Exclusive
This package is only suitable +18 for those who like to see Stunning Perfect Lux Girls / Women in the world + Busty Girls / Women⭐⭐⭐⭐⭐
----------------------
Note* Requests for variations characters are also accepted so feel free to let me know!
$49/month


Suggested Deviants


Suggested Collections


![[3DS MAX/Vray] Mortal Kombat 9 - Jade](https://images-wixmp-ed30a86b8c4ca887773594c2.wixmp.com/f/9cd5abb0-2406-463f-9671-2ad57b865912/d9zuu88-4e539d38-bfa7-4b8f-97bb-b702379cb7c5.png/v1/crop/w_184,h_184,x_15,y_0,scl_0.11825192802057/_3ds_max_vray__mortal_kombat_9___jade_by_xenon90_d9zuu88-92s-2x.png?token=eyJ0eXAiOiJKV1QiLCJhbGciOiJIUzI1NiJ9.eyJzdWIiOiJ1cm46YXBwOjdlMGQxODg5ODIyNjQzNzNhNWYwZDQxNWVhMGQyNmUwIiwiaXNzIjoidXJuOmFwcDo3ZTBkMTg4OTgyMjY0MzczYTVmMGQ0MTVlYTBkMjZlMCIsIm9iaiI6W1t7ImhlaWdodCI6Ijw9Nzc4IiwicGF0aCI6IlwvZlwvOWNkNWFiYjAtMjQwNi00NjNmLTk2NzEtMmFkNTdiODY1OTEyXC9kOXp1dTg4LTRlNTM5ZDM4LWJmYTctNGI4Zi05N2JiLWI3MDIzNzljYjdjNS5wbmciLCJ3aWR0aCI6Ijw9MTAyNCJ9XV0sImF1ZCI6WyJ1cm46c2VydmljZTppbWFnZS5vcGVyYXRpb25zIl19.M4c6GobhzbKjn4oVRKHhgk8snjcesFAs54KI_k3kuGM)
![[3DS MAX/Vray] Mortal Kombat 9 - Jade](https://images-wixmp-ed30a86b8c4ca887773594c2.wixmp.com/f/9cd5abb0-2406-463f-9671-2ad57b865912/d9zuu88-4e539d38-bfa7-4b8f-97bb-b702379cb7c5.png/v1/crop/w_92,h_92,x_7,y_0,scl_0.059125964010283/_3ds_max_vray__mortal_kombat_9___jade_by_xenon90_d9zuu88-92s.png?token=eyJ0eXAiOiJKV1QiLCJhbGciOiJIUzI1NiJ9.eyJzdWIiOiJ1cm46YXBwOjdlMGQxODg5ODIyNjQzNzNhNWYwZDQxNWVhMGQyNmUwIiwiaXNzIjoidXJuOmFwcDo3ZTBkMTg4OTgyMjY0MzczYTVmMGQ0MTVlYTBkMjZlMCIsIm9iaiI6W1t7ImhlaWdodCI6Ijw9Nzc4IiwicGF0aCI6IlwvZlwvOWNkNWFiYjAtMjQwNi00NjNmLTk2NzEtMmFkNTdiODY1OTEyXC9kOXp1dTg4LTRlNTM5ZDM4LWJmYTctNGI4Zi05N2JiLWI3MDIzNzljYjdjNS5wbmciLCJ3aWR0aCI6Ijw9MTAyNCJ9XV0sImF1ZCI6WyJ1cm46c2VydmljZTppbWFnZS5vcGVyYXRpb25zIl19.M4c6GobhzbKjn4oVRKHhgk8snjcesFAs54KI_k3kuGM)
You Might Like…


Featured in Groups


Description
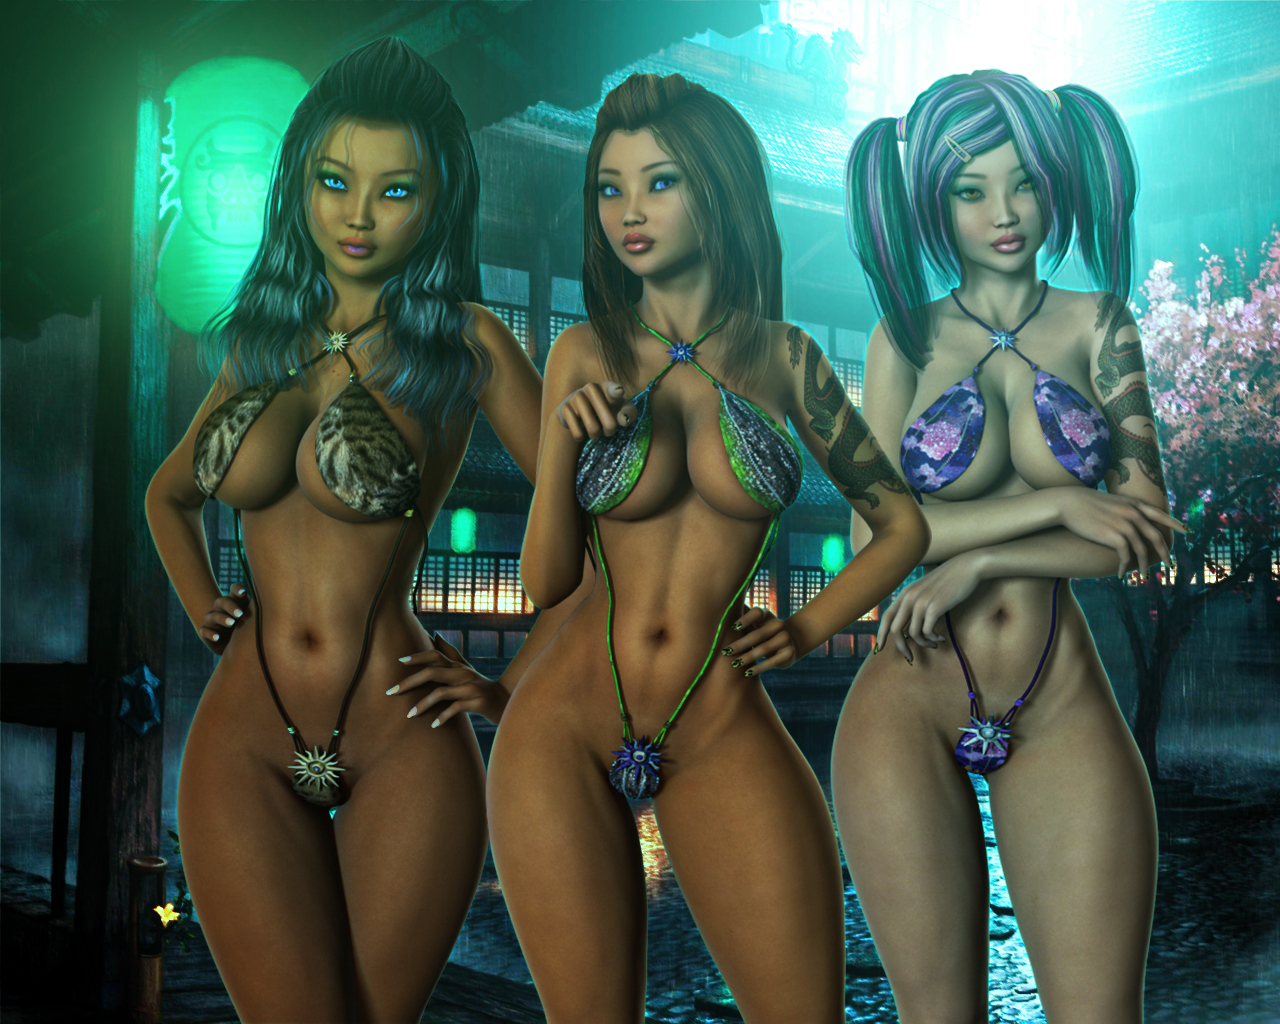
Introducing my latest (at the time of this post) "Avalancher custom original" character: Jonica (unless you guys/gals have a better name...)! Rendered in DAZ 4.7 (yep, 3Delight); moderate postwork in Photoshop CS6. The background comes from wallpoper.com.
I actually made this BEFORE "Shades of Jonica," LOL! I was in the middle of a project, and I need another Asian-looking "Avalancher custom original" character; so, I played with some morphs and got Jonica... Then, I played around with some skin textures and the Surfaces tab to see some different skin tones.
Here's three different skin tones of her... Which skin tone is your favorite: "dark," "bronze," or "light"? I think I like dark and bronze....
********************************************
Now, THIS character is truly Asian, unlike Kari, LOL! Kari "lied" to me!!!! I thought she had some of Jade in her, but she doesn't!!! If you look closely at Kari's morph recipe, you'll notice she has some Caucasian and Indian blood in her, LOL!!!!! Did she fake that Thailand passport??? I put Kari and Yumi side-by-side with Jonica to see if they were similar; they're not, LOL. Jonica is unique from the two.
The dark Jonica has Yumi's skin tone (changed in the Surfaces tab -> Red: 206, Green: 164, and Blue: 115); she has Bandua Hair (hairstyle 02). The bronze and light ones are Jade's skin texture; the bronze one's was manipulated in the Surfaces tab (Red: 255, Green: 204, Blue: 142). The bronze one has good ole Aubree Hair, and the light one has sweet ole Kiriko Hair. Their outfits come from Culte Solaire V4 and NYC Couture Culte Solaire.
********************************************
Here's Jonica's morph recipe:
 Head Morphs
 (Wink)") EJEstrellaHead = 0.2
EJEstrellaHead = 0.2
Gogo Head = 0.75
Jade = 1
Lotus = 0.1
Body Morphs
 (Smile)") Meridiana Body / Xiao Mei / Glutes Size / Feet Arch (optional, LOL) = 1
Meridiana Body / Xiao Mei / Glutes Size / Feet Arch (optional, LOL) = 1
Olympia Body / Breasts Implants = 0.2
Aiko 6 Body / Shin Thickness = 0.7
Forearms Size / Upper Arms Size = 0.3
Breasts Cleavage = 0.5
Hip Size = -0.75
Thigh Thickness = 1.3 (remove the limit in the parameter settings)
Nails Length = 1.0 (a change of pace from the claw nails...)
(as with my other morph recipes, other morphs not mentioned in this list will be automatically adjusted; so, don't panic....)
********************************************
Special thanks to the YouTube Photoshop tutorials:
Create a Sunset Glow with Photoshop #66
FREAKY AMAZING DETAILS (Photoshop Tutorial by Calvin Hollywood) (I used one group with Surface Blur and another with Gaussian Blur; both group opacities to 50%)
Fantasy Lighting Photoshop Tutorial by PSD Box (the iris and lips highlights, and the burn tool, for all you newbies....)
How to Create Fake Rim Lighting #33
********************************************
Now, would you like to know how I did this in Photoshop CS6? Well, I'm gonna jot it down anyways for my own reference, LOL!
1. Loaded the background (yeah, too bad it ain't 3000 pixels...). Did the FREAKY AMAZING DETAILS but with Gaussian blur (60) instead of Surface blur....
2. Duplicated (or load, if you're lazy...) the background again, this time on top of the Gaussian blur group. Set the opacity to 50% and the blending mode to Soft Light (for some "dramatic flavor").
3. "Summoned" the 3 Jonica PNG renders I made in DAZ3D (yep, Keshi's light set) and put 'em where I wanted to put 'em and adjusted their size(s). Once finished, I duplicated these layers, hid the original PNGs, and merged the duplicate PNGs and called the merged layer "Jonicas." (I kept the original PNGs and just hid them in case I did something crazy with "Jonicas." For this pic, it was an unnecessary back-up plan...)
4. Did the FREAKY AMAZING DETAILS, this time with a Gaussian Blur group (Gaussian blur = 60) and a Surface Blur group (Surface blur values = 20); both group opacities to 50%. Grouped these groups into another group called "Details Group"...
5. Duplicated (or load, if you're lazy...) the background yet AGAIN and put it over the Details Group as a clipping mask. Soft Light, 50% opacity... This sort of helps Jonica blend in with the scene
6. I didn't like how the right light-skinned Jonica's face was a bit too bright due to the Gaussian blur group; so, I did a burn layer to darken the face a bit.
7. Created another group called "Highlights" on top of all the layers. Created some Color Dodge layers to highlight the irises and lips a bit (each part had its own layer; for example, the dark Jonica had a highlight layer for her eyes and one for her lips, etc.....)
8. Put all the layers/groups dealing with Jonica (from the merged layer in Step 3 all the way to the "Highlights" group in Step 7) into a group called "Characters" (or whatever the hell you wanna call it).
9. (I actually did this part after the flare Steps 10 and 11, but what the hell....) I did some rim light magic with the merged Jonica layer from Step 3 ("Jonicas"). I just did the inner and outer glow with Color Dodge. Kept the opacity and whatever at default and chose the color value 02968a (a dark cyan-looking color). Didn't create a separate layer for the glows; didn't feel the need to...
10. Using the sun flare magic, I created a "Sun Flare" and a "Lantern Flare" groups......... I made the flare effects kind of big and put them behind (on the bottom of) the "Characters" group!!!
11. Duplicated the "Sun Flare" and a "Lantern Flare" groups, merged the groups to where I had a "Sun Flare copy" layer and a "Lantern Flare copy" layer. Put these layers in front of (on the top of) the "Characters" group!!! Adjusted the size and fill. For the "Sun Flare copy," the light-skinned Jonica's hair and face was getting too much exposure; so, I made a layer mask on "Sun Flare copy" and masked it a little with a grey brush...
12. The finale, LOL. I made a Photo Filter adjustment layer above all other layers (duh!) and set the color to 1dead4 (a cyan-looking color; dead is purely coincidental, LOL!). Density to 50%.
I actually made this BEFORE "Shades of Jonica," LOL! I was in the middle of a project, and I need another Asian-looking "Avalancher custom original" character; so, I played with some morphs and got Jonica... Then, I played around with some skin textures and the Surfaces tab to see some different skin tones.
Here's three different skin tones of her... Which skin tone is your favorite: "dark," "bronze," or "light"? I think I like dark and bronze....
********************************************
Now, THIS character is truly Asian, unlike Kari, LOL! Kari "lied" to me!!!! I thought she had some of Jade in her, but she doesn't!!! If you look closely at Kari's morph recipe, you'll notice she has some Caucasian and Indian blood in her, LOL!!!!! Did she fake that Thailand passport??? I put Kari and Yumi side-by-side with Jonica to see if they were similar; they're not, LOL. Jonica is unique from the two.
The dark Jonica has Yumi's skin tone (changed in the Surfaces tab -> Red: 206, Green: 164, and Blue: 115); she has Bandua Hair (hairstyle 02). The bronze and light ones are Jade's skin texture; the bronze one's was manipulated in the Surfaces tab (Red: 255, Green: 204, Blue: 142). The bronze one has good ole Aubree Hair, and the light one has sweet ole Kiriko Hair. Their outfits come from Culte Solaire V4 and NYC Couture Culte Solaire.
********************************************
Here's Jonica's morph recipe:
(as with my other morph recipes, other morphs not mentioned in this list will be automatically adjusted; so, don't panic....)
********************************************
Special thanks to the YouTube Photoshop tutorials:
********************************************
Now, would you like to know how I did this in Photoshop CS6? Well, I'm gonna jot it down anyways for my own reference, LOL!
1. Loaded the background (yeah, too bad it ain't 3000 pixels...). Did the FREAKY AMAZING DETAILS but with Gaussian blur (60) instead of Surface blur....
2. Duplicated (or load, if you're lazy...) the background again, this time on top of the Gaussian blur group. Set the opacity to 50% and the blending mode to Soft Light (for some "dramatic flavor").
3. "Summoned" the 3 Jonica PNG renders I made in DAZ3D (yep, Keshi's light set) and put 'em where I wanted to put 'em and adjusted their size(s). Once finished, I duplicated these layers, hid the original PNGs, and merged the duplicate PNGs and called the merged layer "Jonicas." (I kept the original PNGs and just hid them in case I did something crazy with "Jonicas." For this pic, it was an unnecessary back-up plan...)
4. Did the FREAKY AMAZING DETAILS, this time with a Gaussian Blur group (Gaussian blur = 60) and a Surface Blur group (Surface blur values = 20); both group opacities to 50%. Grouped these groups into another group called "Details Group"...
5. Duplicated (or load, if you're lazy...) the background yet AGAIN and put it over the Details Group as a clipping mask. Soft Light, 50% opacity... This sort of helps Jonica blend in with the scene
6. I didn't like how the right light-skinned Jonica's face was a bit too bright due to the Gaussian blur group; so, I did a burn layer to darken the face a bit.
7. Created another group called "Highlights" on top of all the layers. Created some Color Dodge layers to highlight the irises and lips a bit (each part had its own layer; for example, the dark Jonica had a highlight layer for her eyes and one for her lips, etc.....)
8. Put all the layers/groups dealing with Jonica (from the merged layer in Step 3 all the way to the "Highlights" group in Step 7) into a group called "Characters" (or whatever the hell you wanna call it).
9. (I actually did this part after the flare Steps 10 and 11, but what the hell....) I did some rim light magic with the merged Jonica layer from Step 3 ("Jonicas"). I just did the inner and outer glow with Color Dodge. Kept the opacity and whatever at default and chose the color value 02968a (a dark cyan-looking color). Didn't create a separate layer for the glows; didn't feel the need to...
10. Using the sun flare magic, I created a "Sun Flare" and a "Lantern Flare" groups......... I made the flare effects kind of big and put them behind (on the bottom of) the "Characters" group!!!
11. Duplicated the "Sun Flare" and a "Lantern Flare" groups, merged the groups to where I had a "Sun Flare copy" layer and a "Lantern Flare copy" layer. Put these layers in front of (on the top of) the "Characters" group!!! Adjusted the size and fill. For the "Sun Flare copy," the light-skinned Jonica's hair and face was getting too much exposure; so, I made a layer mask on "Sun Flare copy" and masked it a little with a grey brush...
12. The finale, LOL. I made a Photo Filter adjustment layer above all other layers (duh!) and set the color to 1dead4 (a cyan-looking color; dead is purely coincidental, LOL!). Density to 50%.
Image size
1280x1024px 1.02 MB
© 2015 - 2024 ambient-avalancher
Comments67
Join the community to add your comment. Already a deviant? Log In
fall in love tree goddess
browse my gallery and say your oppinion