ShopDreamUp AI ArtDreamUp
Deviation Actions


anusbigbreastsbootycambodiachinesechinesetempledarkdrivebyegyptianegyptiangoddessepicepicfantasyghettobootyhalfasianhapahappahiphopraphotsexyindianjonicamixedphotoshopringshadesofgreytajmahalthaithighsvoluptuouswallpaperwarrioryugiohduelmonstersyugiohyugiohbronzeskinslantedeyesbootybuttepicwallpaperhiphopmodelthickthighsipadwallpaperasianorientaldarkskinnedgirlpsvitawallpapercurvyhipstabletdigitaldazstudiopro47psvitawallpapers
Description
Check out all the editions! You KNOW you want them!
Rated PG & Rated PG13
Rated X (shaved) & Rated H (Hairy)
Rated M & Rated A (Ornamental versions)
The "HD" editions:
:origin()/pre14/369e/th/pre/i/2015/145/6/a/chandrani_hd___rated_m_by_ambient_avalancher-d8uqy2j.jpg)
:origin()/pre05/c986/th/pre/i/2015/145/d/1/chandrani_hd___rated_h_by_ambient_avalancher-d8uqy3o.jpg)
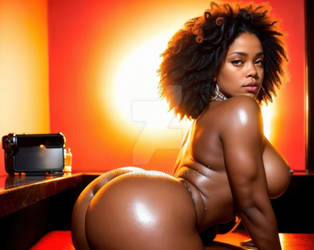
Now, this is my type of edition, along with Rated H, LOL! This is probably my second favorite edition.....
Yes, I know PS Vita is supposed to have a 960x544 rez, but I doubled the rez so you can zoom in on that face and booy!
 (Wink)") Don't forget to download the original image for the full 1920x1088 rez!
Don't forget to download the original image for the full 1920x1088 rez!
It's that Chinese Indian "Avalancher original" character Chandrani!!!
Special thanks to for coming up with the name "Chandrani"!
I pushed myself to the limits on this one! This pic was inspired by a PS Vita fighter girl theme which looks close to this this pic; I was trying to do something cool and similar in Photoshop with <a wytiwyg="1" href="www.wallpedes.com/epic-wallpap… pic</a>, but I didn't know what I was doing, LOL! So, I had to " retreat"="" and="" get="" some="" ideas="" from="" <a="">this tutorial (to bad it ain't the full version anymore!); then, I was playing around with that epic Taj Mahal pic and came up with an idea... The rest is dA history!
Songs that kept playing in my head during the Photoshop postwork were:
"2 On (M&N Pro's Zouk/Kizomba Remix)" by Tinashe featuring ScHoolboy Q (warning: dirty lyrics!)
 (Smile)") "E.P.I.C." by Machel Montano (when things started to look "epic" during the trial-and-error possess...)
"E.P.I.C." by Machel Montano (when things started to look "epic" during the trial-and-error possess...)
"Haule Haule" (when thinking about how hot Chandrani looks!)
*************************
Get ready for some extreme, boring documentation:
Stuff used (NOTE: this document lists stuff used for all the rating editions):
 Softwares (you watchers should know these by heart, LOL)
DAZ3D 4.7 (yes, 3Delight with Keshi's lightset; moved the fill light a bit to shed more light to that bootyhole! Rendered the Chandranis as 1920x1088 rez PNGs)
Photoshop CS6
Images
Taj Mahal
Chinese architecture by kimmyjune
Chinese Temple by HueHang
FREE Photoshop Resources
Bird Photoshop Brushes from Obsidian Dawn
High Res PSD Planets by edubz02
Custom Lens Flares Pack from Media Militia
Photoshop Workbench 392: The Grunge Drama and Edginess Secret Weapon (when it used to be free!) ")
Photoshop Workbench 231: Creating a Seamless Photo Collage (when it used to be free!)
3D Content
Surat Spice Bundle
Apollonia Hair (the default style and Style "S16")
Body Hairs (Rated H): REAL Hairy and my faithful Laticis's FREE - Pubic Hair for the Gen2 Female
AnusGen 2
Accessories (Rated M and A): Kali Bundle, Jewels of the Orient, and Hanyma BeJeweled
Tattoos (besides Nita's hennas): Inked Vol.2 (booty kiss mark), Inked Vol.4 (hand henna), and Tattoo Parlor Vol.1 (dragon sleeve arm, butterfly back, star torso right, and dragon side).
Clothes (PG and PG13): Kazumi, <a wytiwyg="1" href="www.daz3d.com/desert-dancer-ou… Dancer Outfit</a>, <a wytiwyg=" 1"="">Retro SciFi Bodysuit, Retro SciFi Bodysuit Textures, Fantasia (turned down the scarves opacity to 0%), and Chimera for Fantasia
Weapons (PG13): Eliminator and Heroine Fantasy Poses & Weapons (mess around with the diffuse texture and put in Chimera's jewelry texture, LOL)
Keshi's lightset LOL
Cat ears: Tandy Hair (I don't know why I did it.....) 
*************************
Here's their morph! I loaded Nita and did the following:
Head Morphs
Nita = 0.8 to 1.0 (for this pic, I used 0.8)
EJEstrellaHead / Sl_Jade / Lotus Head = 0.2
Face Heart / Face Round = 0.1
Chin Depth = -0.5
Eyes Angle = 0.15
Body Morphs
messed with the nipples... Nipple morphs vary depending on the edition....
Nita Body / Thigh Thickness = 1
Lotus Body / Breasts Cleavage / Thigh Thickness2 = 0.5
Hip Size = -0.5
Arm Thickness = 30%
Breasts Size = 0.2
Glutes Size & Glute Size = 1 (oh yeah!)
Shin Thickness = 0.7
*************************
Wanna know how I did this in Photoshop? Who cares! I'm gonna type it down anyways for my own reference, LOL! There was some trial-and-error stuff goin' on in this pic......................but I'm not gonna give you the errors.............................
1. Created a 1920x1088 pixel document 'cuz I'm an idiot, LOL! I could've just loaded one of my 1920x1088 rez renders and filled it with black..... Loading the Chandrani PNGs would've been a bit easier...
2. Loaded that epic Taj Mahal pic and adjusted it until the pic is positioned the way you see it in the final image. Gaussian blurred it by 60.
3. I actually did this later, but...... Loaded that High Res PSD Planet (70% opacity to make it more "faded") and eventually decided to put it in the middle of the pic. Loaded another Taj Mahal (80% opacity) on top of the Planet in the layers panel. Using layer masks (soft brush), I masked out the two towers to the sides and the sky so you can see the planet...
4. I wanted to keep the left tower of the Taj Mahal, but I decided to load that Chinese Temple (70% fill). (This was actually the last building I decided to put in...). Masked out parts I didn't like and flipped it horizontally...
5. Created a blank layer (Normal blending mode, 100% opacity/fill; unless otherwise stated, this is the assumption for new layers in this mini tutorial...) and threw in some birds with one of those fancy Bird Photoshop Brushes. Created a blank layer and made some clouds (Filter > Render > Clouds). Screen blending mode...
6. Threw in custom lens flare #16 (Screen blending mode) and desaturated it and Gaussian blurred it by 2; put it beside that Chinese Temple in Step 4 for a fancy sunlight effect. (the flare was originally intended for that left tower of the Taj Mahal, but since Chandrani's Indian AND Chinese...........). Then, I loaded the Chinese architecture (well, I actually loaded this one before the temple in the trial-and-error process.....) (50% opacity AND fill) and masked out some parts with a soft black brush. Duplicated this architecture layer and set the blending mode to Multiply to make it stand out a little more without the highlights looking so bright...
7. Created a group called "Group 1" (forgot to name it "Characters" or "Chandrani") and "summoned" (loaded) the Chandranis renders I made in DAZ3D (adjusted Keshi's fill light to shed more light on that precious booty)! Made sure all the rating editions (PG, PG13, X, M, A, and the ultimate H) were in this doggone group. I actually did this later, but I created a rim effect: Double-clicked the "fx" symbol on the group and created an Inner Glow effect (used the color a8997d at Color Dodge); now, all the Chandranis will have that rim effect. For the rest of this tutorial until the end, I hid all Chandrani layers except the PG one...
8. Remember that Gaussian blurred Taj Mahal pic all the way from Step 2? I duplicated that layer twice and put them on top of the Chandrani group as clipping masks (Overlay blending mode for both). The second Overlay layer (50% opacity) has a layer mask; I masked out the frontal Chandrani since I thought only the Chandrani on her knees needs more light...
9. Using a Photo Filter, I loaded a Warm Filter (85) and set its density to 50% (Preserve Luminosity). Remember that cloudy layer in Step 5? I duplicated it (20% opacity), flipped it vertically, and put it on top of all the layers so far so the Chandrani layers can have a cloudy effect and look blended into the image.
10. For some cheap "vignette effect," if you could call it that, I duplicated the cloudy layer (Multiply, 50% opacity and fill). Masked out parts I didn't like so that the Chinese architecture layer from Step 6 had some "cloudy vignetting" around that area. Duplicated this layer and masked more parts til half the buttom if the image had some mild "cloudy vignetting" (didn't want to do the whole thing since I thought it wouldn't make sense since the sun seems to be coming from the left...). Duplicated this buttom layer and put it on top of the image and fixed it up by masking it to blend with the vignette around the Chinese architecture layer.......................
11. Hid the Chandrani group and then created a stamp (Ctrl/CMD+Alt+Shift+E). Set it to Linear Light, 10% opacity, and 25% fill. (I wanted to see if I could create that "Avalancher effect" like in "Griffin Harlot" and "CaucAsian Latina Fauntaur Hooker," but it didn't suit what I wanted to do with this image.....so, I set it to Linear Light, 10% opacity, and 25% fill...)
12. Now, the cool part! I unhid the PG Chandrani women layer and did my new, beloved Photoshop Workbench 392: The Grunge Drama and Edginess Secret Weapon (too bad it ain't free anymore). Since it ain't for free anymore, lemme give you the gist: I saved the pic as it is as a JPEG and opened that JPEG to Photoshop in another tab. In that new tab, I went to Image > Adjustments > HDR Toning... Turned down the saturation and highlight (all the way down, LOL) and turned up the shadow and detail (all the way down, LOL); radius is 32, and strength is 0.52 px, and clicked OK (or pressed Enter on the keyboard). I didn't think this pic needed any more highlights since it's sunny, and I didn't want the shadows to be too dark (it would be over-dramatic for what I envisioned for this image).
13. Now, the magic part! With the move tool selected (press V on the keyboard), I dragged down this new tab with the mouse to show our original tab in the background held down Shift while dragging the HDR Toned image to our original tab. (You can close the new tab and get back to our original tab from Step 1). I set the new HDR Toned layer to Soft light, and whalah! Then, I saved this image as a JPEG. Then, I hid the toned layer and the Rated PG layer and unhid another Chandrani layer and repeated Steps 12 and 13 until all editions where finished.
Rated PG & Rated PG13
Rated X (shaved) & Rated H (Hairy)
Rated M & Rated A (Ornamental versions)
The "HD" editions:
Mature Content
Mature Content
Now, this is my type of edition, along with Rated H, LOL! This is probably my second favorite edition.....
Yes, I know PS Vita is supposed to have a 960x544 rez, but I doubled the rez so you can zoom in on that face and booy!
It's that Chinese Indian "Avalancher original" character Chandrani!!!
Special thanks to
for coming up with the name "Chandrani"!I pushed myself to the limits on this one! This pic was inspired by a PS Vita fighter girl theme which looks close to this this pic; I was trying to do something cool and similar in Photoshop with <a wytiwyg="1" href="www.wallpedes.com/epic-wallpap… pic</a>, but I didn't know what I was doing, LOL! So, I had to " retreat"="" and="" get="" some="" ideas="" from="" <a="">this tutorial (to bad it ain't the full version anymore!); then, I was playing around with that epic Taj Mahal pic and came up with an idea... The rest is dA history!
Songs that kept playing in my head during the Photoshop postwork were:
*************************
Get ready for some extreme, boring documentation:
Stuff used (NOTE: this document lists stuff used for all the rating editions):
*************************
Here's their morph! I loaded Nita and did the following:
*************************
Wanna know how I did this in Photoshop? Who cares! I'm gonna type it down anyways for my own reference, LOL! There was some trial-and-error stuff goin' on in this pic......................but I'm not gonna give you the errors.............................
1. Created a 1920x1088 pixel document 'cuz I'm an idiot, LOL! I could've just loaded one of my 1920x1088 rez renders and filled it with black..... Loading the Chandrani PNGs would've been a bit easier...
2. Loaded that epic Taj Mahal pic and adjusted it until the pic is positioned the way you see it in the final image. Gaussian blurred it by 60.
3. I actually did this later, but...... Loaded that High Res PSD Planet (70% opacity to make it more "faded") and eventually decided to put it in the middle of the pic. Loaded another Taj Mahal (80% opacity) on top of the Planet in the layers panel. Using layer masks (soft brush), I masked out the two towers to the sides and the sky so you can see the planet...
4. I wanted to keep the left tower of the Taj Mahal, but I decided to load that Chinese Temple (70% fill). (This was actually the last building I decided to put in...). Masked out parts I didn't like and flipped it horizontally...
5. Created a blank layer (Normal blending mode, 100% opacity/fill; unless otherwise stated, this is the assumption for new layers in this mini tutorial...) and threw in some birds with one of those fancy Bird Photoshop Brushes. Created a blank layer and made some clouds (Filter > Render > Clouds). Screen blending mode...
6. Threw in custom lens flare #16 (Screen blending mode) and desaturated it and Gaussian blurred it by 2; put it beside that Chinese Temple in Step 4 for a fancy sunlight effect. (the flare was originally intended for that left tower of the Taj Mahal, but since Chandrani's Indian AND Chinese...........). Then, I loaded the Chinese architecture (well, I actually loaded this one before the temple in the trial-and-error process.....) (50% opacity AND fill) and masked out some parts with a soft black brush. Duplicated this architecture layer and set the blending mode to Multiply to make it stand out a little more without the highlights looking so bright...
7. Created a group called "Group 1" (forgot to name it "Characters" or "Chandrani") and "summoned" (loaded) the Chandranis renders I made in DAZ3D (adjusted Keshi's fill light to shed more light on that precious booty)! Made sure all the rating editions (PG, PG13, X, M, A, and the ultimate H) were in this doggone group. I actually did this later, but I created a rim effect: Double-clicked the "fx" symbol on the group and created an Inner Glow effect (used the color a8997d at Color Dodge); now, all the Chandranis will have that rim effect. For the rest of this tutorial until the end, I hid all Chandrani layers except the PG one...
8. Remember that Gaussian blurred Taj Mahal pic all the way from Step 2? I duplicated that layer twice and put them on top of the Chandrani group as clipping masks (Overlay blending mode for both). The second Overlay layer (50% opacity) has a layer mask; I masked out the frontal Chandrani since I thought only the Chandrani on her knees needs more light...
9. Using a Photo Filter, I loaded a Warm Filter (85) and set its density to 50% (Preserve Luminosity). Remember that cloudy layer in Step 5? I duplicated it (20% opacity), flipped it vertically, and put it on top of all the layers so far so the Chandrani layers can have a cloudy effect and look blended into the image.
10. For some cheap "vignette effect," if you could call it that, I duplicated the cloudy layer (Multiply, 50% opacity and fill). Masked out parts I didn't like so that the Chinese architecture layer from Step 6 had some "cloudy vignetting" around that area. Duplicated this layer and masked more parts til half the buttom if the image had some mild "cloudy vignetting" (didn't want to do the whole thing since I thought it wouldn't make sense since the sun seems to be coming from the left...). Duplicated this buttom layer and put it on top of the image and fixed it up by masking it to blend with the vignette around the Chinese architecture layer.......................
11. Hid the Chandrani group and then created a stamp (Ctrl/CMD+Alt+Shift+E). Set it to Linear Light, 10% opacity, and 25% fill. (I wanted to see if I could create that "Avalancher effect" like in "Griffin Harlot" and "CaucAsian Latina Fauntaur Hooker," but it didn't suit what I wanted to do with this image.....so, I set it to Linear Light, 10% opacity, and 25% fill...)
12. Now, the cool part!
13. Now, the magic part!
Image size
1920x1088px 1.36 MB
Mature
© 2015 - 2024 ambient-avalancher
Comments2
Join the community to add your comment. Already a deviant? Log In
cool i love her piercing ! 
